Email Migration Checklist: How to Transfer Business Email
Business email migration, also known as email migration for organizations, is the process of transferring company emails and folders between platforms such as Office 365, Google Workspace, and IMAP-based service providers.
This checklist-style guide outlines the main migration approaches organizations use, key planning steps, and common risks to avoid when transferring business mailboxes.
- Email transfer vs. email migration
- Cloud email migration checklist
- How to migrate emails from one company to another automatically
- How to migrate your business email for free
- How to do secure email migration for your business
- How long does email migration take?
- Email migration best practices
- Related articles
Email transfer vs. email migration
The terms "email transfer" and "email migration" are often used interchangeably. Both refer to the process of moving email data from one account or system to another. However, there are subtle distinctions worth noting.
Email transfer typically describes a user-level process of copying emails from one account to another. Email migration, on the other hand, is a broader, organization-wide operation that may involve multiple mailboxes, domains, and associated data such as calendars and contacts.
Despite these differences, most people, including IT professionals, use both terms to describe the same basic action: moving email data to a new location.
Interestingly, what we call “moving” email data is almost always a copy operation, not a literal transfer in the traditional sense, due to reasons related to compliance, data safety, and others.
Cloud email migration checklist
If you are new to email migration and don't know where to start, here's a quick overview of the migration process. You can use this migration plan when creating a timeline and a to-do list for your email migration.
The email migration process typically includes these stages:
-
Preparation.
Start by identifying what needs to be moved: emails, folders or labels, attachments, contacts, calendars, or other types of data as well. Check the storage use in the source and evaluate the compatibility between the source and destination platforms. Ensure both source and destination are accessible and have enough free storage space for each user.
Remember that all user accounts must be fully set up before you start migrating your data. For detailed instructions on how you can prepare for migration to major service providers, see the following articles:
Google Workspace Migration: VaultMe's Step-by-Step Guide
Office 365 Migration Guide: How to Prepare and Migrate to Office 365
-
Backup.
If you are planning to remove the content from the source after the migration or deactivate the source accounts, take a backup before migrating your mailboxes.
-
Selecting the email migration tool.
There are two types of email migration services: free tools provided by Google and Microsoft, and third-party tools that offer independent migration services. Third-party tools are typically compatible with nearly all email accounts and are often referred to as email migrators, email migration tools or services, and email migration software.
For small accounts or individual users, semi-manual options like IMAP transfers may suffice. For larger volumes or more complex needs, it's best to use an automated migration tool that can retain folder structure, timestamps, and read/unread status.
The following article explains different types of email migration software and when to use them: Email Migration Tools and Services: What to Use and How.
Note that email migration tools only copy user data. The destination accounts must be set up and configured manually.
-
Execution.
Decide when to migrate mailboxes so that the business operations are not disturbed. With most automated tools, users can continue working with their accounts, but accounts may perform more slowly than usual.
We provide email migration best practices in one of the next sections of this article.
-
Verification and post-migration setup.
After the migration, review the destination accounts to confirm that all expected content is present and accessible. If the migration tool of your choice generates migration reports, download them and keep them for future reference.
If you are changing the domain name, the MX records don't have to be updated. However, if you are migrating email without changing the email addresses for your users, you need to update the MX records so that mail is pointed to the new accounts after the migration.
You should also instruct users to reconfigure the settings, such as filters, forwarding rules, or signatures.
-
Deactivation of the old system.
We recommend keeping the source system active for at least two weeks after the migration. It's best to avoid shutting down source accounts immediately after the migration to avoid confusion
How to migrate emails from one company to another automatically
If you are an admin or a business owner planning an enterprise email migration, consider using VaultMe for Admins for your migration project.
VaultMe for Admins is a secure, automated tool for cloud email migration. With Vaultme for Admins, you can perform a Gmail to Gmail email transfer or transfer emails between Outlook/Exchange, GoDaddy, Google Workspace, and many other email accounts. Its intuitive interface makes it easy to use even for professionals with limited experience.

Why choose VaultMe for Admins:
- Supports enterprise email migrations
- Is compatible with hundreds of email service providers, including Google Workspace (Gmail), Microsoft 365 / Office 365 (Outlook), Zoho Mail, GoDaddy, Yahoo, and iCloud
- Supports multiple email protocols, including IMAP
- Supports batch migration
- Requires no software download or installation
- Ensures all content retains its original organization, formatting, and dates in the destination account
- Includes dedicated email migration support
To learn more about how you can benefit from using VaultMe for your migration project, please see: Email migration tool.
To peform email migration using VaultMe for Admins:
-
Navigate to the app.
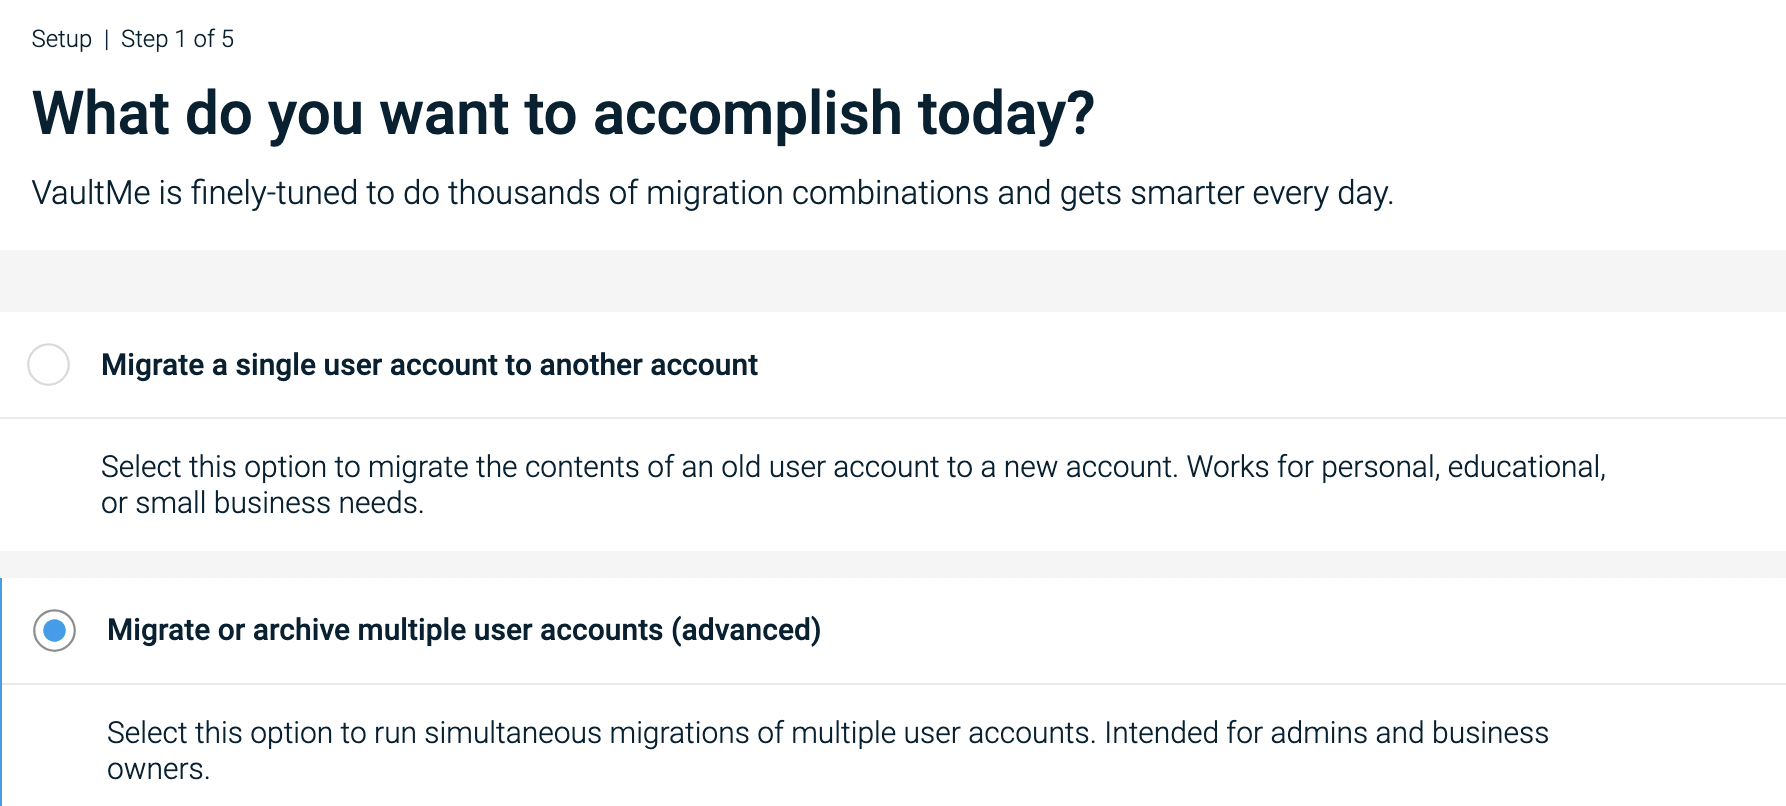
-
Select "Migrate or archive multiple user accounts (advanced)."
Create a VaultMe for Admins profile -
Create a VaultMe for Admins account. If you are performing an email transfer for a client, use your own account to create a VaultMe for Admins profile.
-
Select your source and destination service providers. If your email service provider is not listed among the available options, select "IMAP."
-
Connect your source accounts. Where possible, we recommend using domain authorization.
-
Connect your destination accounts. All user accounts must be fully set and ready to accept migrated data.
-
Create a migration plan. If you are migrating to another email platform without changing the email addresses, you can still add these pairs of email accounts to the migration plan. The app will automatically map source accounts to destination ones.
-
Select what types of content you want to copy. If you are migrating from IMAP accounts, you can copy only emails.
-
Choose how your copied content should be organized in the destination.
-
Let the app calculate the final fee and proceed to checkout. (Our prices are outlined on this page: VaultMe's Pricing. Refer to the VaultMe for Admins pricing.)
-
Start your migration. Feel free to close your browser or even power off your computer.
-
Check back to see the progress of your migration. You'll receive an email notification when it's complete.
-
Download your migration report and check the results.
-
Sync changes between the source and destination accounts if needed. Syncs for up to 30 days after the initial migration date are included in the price.


There will be no downtime. Users will be able to continue working with their accounts, but it's best to minimize use while the migration is in progress.
VaultMe will only copy user data. Any account congifurations will not be transferred, and MX records will not be changed. Consider changing the MX records after the migration after you've reviewed the results.

If you only have 2-3 user accounts to migrate, you can use VaultMe for Individuals and transfer email data for each user one by one. To access VaultMe for Individuals, select "Migrate a single user account to another account."
How to migrate your business email for free
Depending on what email service you are migrating to and from, there may be free options available. These include, among others:
- The IMAP mailbox migration tool for migrations to Microsoft 365
- Google Workspace Migrate for migrations to Google Workspace
However, these options are often difficult to use even for experienced IT professionals. Email migration support is also limited.
In the following article, we outline the pros and cons of free manual tools: Email Migration Tools and Services: What to Use and How.
How to do secure email migration for your business
A secure email transfer ensures that your messages, attachments, and folder structure are copied from one account to another without any risks. While it may be tempting to try free methods, these options are not always ideal.
Secure email transfers are possible with reliable automated tools like VaultMe. VaultMe uses industry-standard encryption and privacy practices to protect your data throughout the migration process:
-
Your login credentials remain protected and are never stored.
-
Emails are copied without alterations to the original messages or folders.
-
Attachments and formatting remain intact.
-
Nothing is lost, duplicated, or leaked during the process.
By using a trusted app like VaultMe, you can perform an email transfer without the technical complexity or risks of manual methods. It's a safe, fast, and efficient solution for personal, academic, or business email migrations.
Our support team would be happy to help you set up email migration for your business.
How long does email migration take?
The answer depends on multiple factors:
-
The total volume of data being migrated, both in terms of the number of items and the size in gigabytes (GBs), as well as the number of user accounts involved.
-
The previous use of accounts. Heavily-used accounts, especially those with recent administrative activity or failed manual migration attempts, may take longer due to throttling from the service provider.
-
Temporary restrictions imposed by email service platforms. Service providers that host the accounts may temporarily limit the speed of email transfers, especially for large accounts. These limitations cannot be bypassed by migration tools.
-
The tool used for the migration. Some automated tools, including VaultMe, are optimized for faster and more efficient transfers than others.
As a general guideline, small accounts may complete migration in just a couple of hours or less, while large accounts might take several days, and very large or complex migrations can extend to several weeks.
Email migration best practices
Email migrations can involve a lot of moving parts, especially if you're working with multiple accounts or large amounts of data. While every situation is a little different, there are some tried-and-true practices that can help the process be more predictable.
Based on our experience at VaultMe, we recommend the following best practices to help you avoid common pitfalls.
-
Use staged migrations for large projects.
Staged migrations reduce risk by moving users in manageable groups. This also helps with testing and minimizing disruption. Many migration tools, including VaultMe for Admins, support staged migrations.
-
Ensure destination storage is sufficient.
All users should have enough free space at the destination for both emails and files. Note that in Google Workspace, storage is shared across Gmail, Drive, and Photos, while in Microsoft 365, Outlook and OneDrive have separate quotas.
-
Check the license and service activation.
If you are migrating not only emails, but also files, for Microsoft 365 accounts, make sure that OneDrive has been activated for each account before beginning the migration.
-
Run migrations during low-activity hours.
Schedule the data transfer overnight or over weekends to minimize user activity.
-
Review folder names.
Before the migration, instruct users to review their mailboxes and ensure that they do not use special characters, slashes, or unusual symbols in folder names.
Related articles
Need to migrate users' email from one Google Workspace account to another? Learn how you can do that: Transfer Google Workspace to Another Account.
Planning a Google Workspace to Microsoft 365 transition? Here's your migration checklist: Migrate From Google Workspace to Office 365, Microsoft 365, or Exchange.
Want to merge multiple mailboxes? This article provides instructions: How to Merge Email Accounts in Gmail, Outlook, and Other Services.
Need to transfer email data for one single user? Learn how this can be accomplished: How to Transfer Emails to Another Email Account.