Back Up Google Account
In an era where our lives are increasingly intertwined with digital platforms, backing up the contents of a Google account is always a good decision.
In this article, we'll explain how you can back up your Google account data for Drive files, Gmail messages, and contacts in two ways:
- Automatically using a migration app like VaultMe
- Manually through export and import
Why backup Google Drive to another account
For many people, the best way to back up a Google account is to copy their Google content to another account. Here's why:
- Your Google account backup will be easily accessible. You will be able to access your data from any device with an internet connection.
- Your backup will be easy to use. Google file types will have no problem being read.
- Your backup will be safe. Computers crash and are often stolen. Hard drives are prone to accidental damage. Keeping a backup in another account will protect your files from being lost or corrupted.
Option 1. Backup Google Drive and Gmail with VaultMe
VaultMe is a cloud-based, fully encrypted online migration tool that copies email, files, contacts, and calendars between Google accounts.
Here are some of VaultMe's advantages:
- All files in your old account – both owned and shared – are copied with their original file names and dates
- All of your folders maintain their organization and labeling
- It takes only a couple of minutes to set up the app to copy over your Google Drive, Gmail, and Contacts. Once VaultMe begins copying your data, you can close your browser and even shut down your computer. The app will work automatically in the cloud
- VaultMe can copy your content to a Google or a Microsoft account. If you are backing up your Google Drive to a different Google account, documents created in native Google formats (Google Docs, Google Sheets, and Google Slides) will retain their original formats.

To create a one-time backup of your Google data:
- Go to the VaultMe app.
- Connect your source account.
- Connect your destination account.
- Select what types of content you want to copy (Drive files, Gmail messages, Contacts, Calendars).
- Start your migration. Feel free to close your browser as you'll get an email when the process is complete.

VaultMe will create an archive of your Drive files, Gmail emails, and contacts in another account. Any future changes to these items in the primary account will not be reflected in the backup account.


Option 2. Backup your Google account for free with Google Takeout
This method involves a lot of manual work, may take days or even weeks of your time, and can provide inaccurate results.
Step 1. Get your Google data using Google Takeout
To download a Google Takeout archive:
- Go to Gmail.com and sign in to your account.
- Navigate to Google Takeout.
- Select the apps you want to export content from and click "Next."
- Select the file type of your Google backup, the size, and the delivery method.
- File type. You have three options: .zip (the most common), .tgz, and .tbz. .Zip tends to be faster because of compression.
- Archive size. Decide how large you want your Google backup archive to be. Let's say your Google account has 75 GB that you are trying to export. If you select the 2 GB option, your archive will be split up between 75/2 = 37.5 (38) folders. However, if you select the 50GB archive option, you will need to download a zip64 file extractor. If you have a small amount, we recommend selecting the 2 GB default option. To check how much storage you have used, go to https://www.google.com/settings/storage.
- Delivery method. This is how your Google Takeout archive will be sent to you for download. It's probably easiest to just select the default option, "Send download link via email."
- When you've selected all three, click "Create Archive."
Congratulations! Your Google backup archive is now being created. At this time, Google is creating your archive and will send you a link (via your delivery method) when it's done.
Keep the following in mind:
- The larger your archive is, the longer it will take for Google to process your data. You'll see a message saying that it could take "hours or possibly days" to create the archive.
- You will only have 7 days to download your Google backup archive before it's deleted.
For more information about the limitations of Google Takeout, refer to this article: Google Takeout Alternative.
Step 2. Unzip the Google Takeout archive
To unzip your Google Takeout archive, right-click on the archive file(s) and select "Extract files". You'll get multiple folders containing data from each of the apps that you've selected for export.
You will note that some of the extracted files cannot be opened without special software. For example, all of your email messages have been exported as .mbox file which is only useable if you import it into a desktop email app.
You will also note that your files have not retained their original organization, so you may need to re-arrange them before importing them. "Shared with me" files will be missing because Google Takeout does not export these.
Step 3. Import Gmail to the new backup account
To access your email archive, go to the Google Takeout folder and locate the "Mail" subfolder. You'll notice that emails from your old account have been compressed into a single .mbox file. That's your Gmail backup.
You will need a third-party desktop email application to access the information inside your .mbox Gmail backup.
To back up Gmail messages:
- Download Mozilla Thunderbird and install it on your computer.
- Set up your account by typing in your email and password and clicking "Continue."
- Select IMAP, select "Keep your folders and emails synced on your server," and click "Done."
Your new Gmail account will appear on the left.
Next, install Thunderbird's "ImportExportTools" add-on:
-
Download the "ImportExportTools" add-on for Thunderbird. Alternatively, you can search for the add-on in the "Add-ons" menu in Thunderbird.

ImportExportTools add-on -
Save ImportExportTools.xpi file to your desktop.
-
Open Thunderbird and at the top navigate to "Tools" and select "Add-Ons."
-
Click the settings icon and then select "Install Add-on From File."
-
Select the "ImportExportTools.xpi file."
-
Click "Install Now."
-
Restart Thunderbird.
Next, import your MBOX file(s):
- In Thunderbird, right-click "Local Folders" on the left → highlight "ImportExportTools" → select "Import mbox file."
- Select "Import directly one or more mbox files" and click OK.
- Select your .mbox file in your Google Takeout export folder.
Your emails will start importing. Give it time because the process may take a while.
Next, move your newly imported labels:
- In Thunderbird, expand "Local Folders" on the left.
- Select the folder with the imported emails.
- Select all emails and right-click to open the context menu.
- Highlight your new Gmail account and select the folder to import these emails into.
You can now go to your new Gmail account and see that your emails from your Google Takeout export are now in your new account.
Step 4. Import Drive files to the new backup account
To import Google Drive files to another account:
-
Go to drive.google.com and sign in to the backup account.
-
Click the "New" button in the upper left.
-
Select "Folder upload."

How to upload folders to Google Drive -
Select the folder with your downloaded Drive files.
Remember that "Shared with" me items have not been exported because Google Takeout does not extract these. You'll need to manually download and upload those files. For more information on how to copy shared items, see this article: https://www.vaultme.com/articles/copy-google-drive-shared-with-me.
Step 5. Import Contacts to the new backup account
When you open the Contacts folder, you will see that your Google Contacts and Contact Groups are now in a .vcf file type.
To back up Gmail contacts:
-
Go to https://contacts.google.com in the backup account.
-
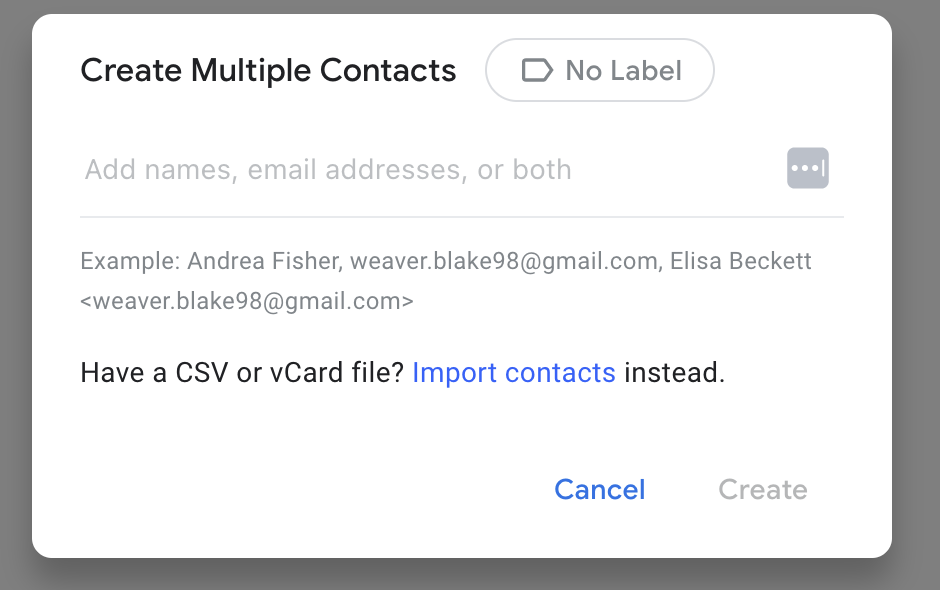
Click the "Create contact" button on the left and select "Create multiple contacts."

The menu for adding contacts in Google Contacts -
Click "Import contacts."
The menu for importing contacts in Google Contacts -
Navigate to the Google Takeout folder and open your Contacts folder.
-
Select your .VCF file.
-
Click "Import."
If you have more than one group, you will need to repeat this process until all of your contacts are imported.
How VaultMe compares to Google Takeout
| Features | VaultMe | Google Takeout |
|---|---|---|
| Copies files from "My Drive" |  |
|
| Copies files from "Shared with me" and "Shared drives" | |
 |
| Doesn't need hard drive storage and stable internet connection | |
|
| Doesn't require manual work | |
|
| Preserves folder/label structure | |
|
| Preserves dates | |
|
| Copies Google Docs, Google Sheets, Google Slides | |
|
| Is recommended for large accounts (10+ GB and/or 10 000+ items) | |
|
| Generates a detailed report | |
|
| Free option | |
|
Frequently asked questions about backing up Google account
What does it mean to back up your account?
To back up an account means to create a copy of your content. There are different ways to back up your data: you can download it to a hard drive, copy it to a different account, or even print out the most valuable documents to have hard copies.
Can I back up my entire Google Drive?
Google Drive does not allow you to create backups in a different account, it is possible to back up your data using third-party tools. While VaultMe is a migration rather than a synchronization tool, you can use it to create a one-time backup of your entire Google Drive in another account.
How do I back up everything in Gmail?
Gmail messages can be downloaded using Google Takeout and imported into an email app. An alternative is to copy your email messages to another account and set up email forwarding. The following article outlines the available options: How to Back Up Gmail Emails.
Conclusion
Even though Google offers first-class security features, backing up your Google account data is always a good idea.
Creating a copy of the content in another online account not only ensures the accessibility of your data from any device with an internet connection but also guarantees its safety, protecting against the potential risks of computer crashes, theft, or accidental damage.
VaultMe is a convenient migration tool that can copy your content to another account while preserving the organization of your Drive files, Gmail messages, and contacts.
Google Takeout is a free alternative but requires a more involved process.
Following the steps detailed in this article, you can successfully back up your Google Drive files, Gmail messages, and contacts. Whether you choose the efficiency of VaultMe or the cost-effectiveness of Google Takeout, having a backup of your Google account data ensures you will always have access to your valuable information.
Related articles
For more information about how you can make a one-time backup of your Google Drive, see this article: Back up Google Drive to Another Account.
If you only need to back up your Gmail emails, refer to this guide: How to back up a Gmail account.
Limitations of Google Takeout are outlined in this post: Alternative to Google Takeout.
Need to back up shared Drive content? See this article: How to Copy "Shared with me" Files from one Google Account to Another.
Want to transfer your Google Docs, Sheets, and Slides to a different account? This article explains the available options: Migrate Google Docs to Office 365 or OneDrive.
Want to back up your Yahoo account? Refer to this article for instructions: How to Backup Yahoo Mail.
Want to change your Gmail address? Learn how you can do that: Change Gmail Address Without Losing Your Data in 2025.
Need to migrate to Google Workspace? Here's your step-by-step guide: Google Workspace Migration: VaultMe's Step-by-Step Guide.